After binding a dozen quilts in a month, I thought I would not want to bind quilts by hand anymore, but I LOVE it still! Here's how I get it done:
This is my collection of quality hand quilting threads, thimbles and a sharp needle. I have a warm and cool neutral, and the yellow I had purchased for actual hand-quilting, but it's come in handy a few times :) I've used less than high quality threads - don't waste your money - they tend to break and knot. And I never used a thimble, until I had a few holes in my finger from the back of the needle :( I've wanted to try the stick on type thimble but haven't had a chance yet.
I keep my supplies with scissors, and the binding clips all in an empty quart yogurt container. It has a lid, so I hopefully don't loose things.
After I iron my binding, away from the quilt top, I turn it under and clip from the front. The clips are not necessary, but if you have any trouble with your hands I highly recommend them. Less fatigue and aches with the binding clips. They help to train the fabric before you tack it down.
Pull out about 18" of thread, or the length you are comfortable with - if it's too long your arm will tire quickly. Knot off one end and find a spot to start! I like to start about 12" away from a corner, that way my homestretch doesn't include a corner. (my own little mind trick!)
Hide your knot in the raw edges, and pull your needle out just below the stitch line.
Now carefully put your needle in the fold, about 1/4" distance and bring it out again. Pull tight, and snug your binding down over the stitch line.
Put your needle in the backing fabric in the same manner, (backing fabric only) and pull tight again, and snug the binding down again.
Continue in the same manner, until you get to the corner.
At the corner, draw your needle up past the stitch line.
Then draw it up, again past the stitch line, in the binding fabric as shown. This secures the binding edge.
Fold the next edge over to form a miter. Slowly thread the needle between the two layers of binding fabric, usually up, down, up, to secure the miter.
Then push the needle back down, catching the backing fabric in the corner, and pull the thread tight.
Make a small stitch in the binding to secure, and continue around the quilt in the same manner.
Here you can "see" my stitches.
Your finished quilt!
I've gotten to the point where a 60" square quilt takes me about 2, maybe 3 hours depending on the interruptions, but my first few quilts took days! I hope that you enjoy snuggling with quilt while you finish your quilt - still one of my favorite parts of quilting.
This is how I've learned to bind and developed my methods as I went - I hope you share your tips in the comments if you've found something that works well for you!
If you have questions I will answer in the comments~
Amy
ps - The quilt pictured is available as a tutorial here.
---------------------------------------------------
Next steps:
Subscribe to Amy's Creative Side
Shop with Amy
Follow Me on Twitter
Become a fan of Amy's Creative Side on Facebook
Email me
Showing posts with label Tutorial. Show all posts
May 18, 2010
May 16, 2010
Basics Tutorial: Sewing Binding to Quilt
Before sewing your binding in place on your quilt top, you should carefully prepare it. Attach your walking foot if you have one, it helps to move all the layers of fabric smoothly under the needle.
Raw edges lined up, begin with a 12" - 18" tale unattached to your quilt, we will get back to that a little later, sew 1/4" away from the raw edges.
If you have a needle down position, use it - you will stop and start a lot to adjust the quilt.
Stop 1/4" away from the corner, and pull your quilt out from under the needle. Fold the fabric away and back down - I typically just pinch it until all the edges are matching.
like so, and continue around your quilt in the same manner, until you are almost back to where you started. Again leave a tail, and 18" gap, of unsewn binding.
Lay your tails overlapping one another in the middle of your gap. Trim one side to the middle of your gap.
With your ruler, measure and mark 2 1/2" of overlap. I use the edge of my ruler - you might take a pencil and mark it.
Now cut away excess. (If you cut your bindings narrower - use that strip measurement for the amount of overlap.)
Now fold your quilt to make room to work, and arrange binding strips at 90 degrees.
Here's a closer look - carefully pin, and mark a line corner to corner.
Because I'm working with the entire quilt, I add a couple or extra pins to keep everything lined up perfectly. Now sew on the marked line.
Now check to make sure it fits nicely before you trim. It's been working like a charm for me for a while :)
Trim away excess 1/4" away from the seam. And continue sewing your binding in place!
The quilt pictured is available as a tutorial here.
A couple of friends have great binding tutorials as well, check out:
Em's Scrap Bag
Jaybird Quilts
Let me know if you have questions and I'll answer in the comments for everyone ~
Amy
---------------------------------------------------
Next steps:
Subscribe to Amy's Creative Side
Shop with Amy
Follow Me on Twitter
Become a fan of Amy's Creative Side on Facebook
Email me
Labels:
Tutorial
Basics Tutorial: Prepping a Binding
Preparing a binding for your quilt takes a few minutes, but it's not difficult! Take your time learning the steps -
Cut 2 1/2" strips, to determine the number of strips: add all 4 sides of your quilt together, then divide by 40.This quilt : 60+62+60+62=244"/40= 6.1 so I round up to 7 You don't want to be short when you get around your quilt.
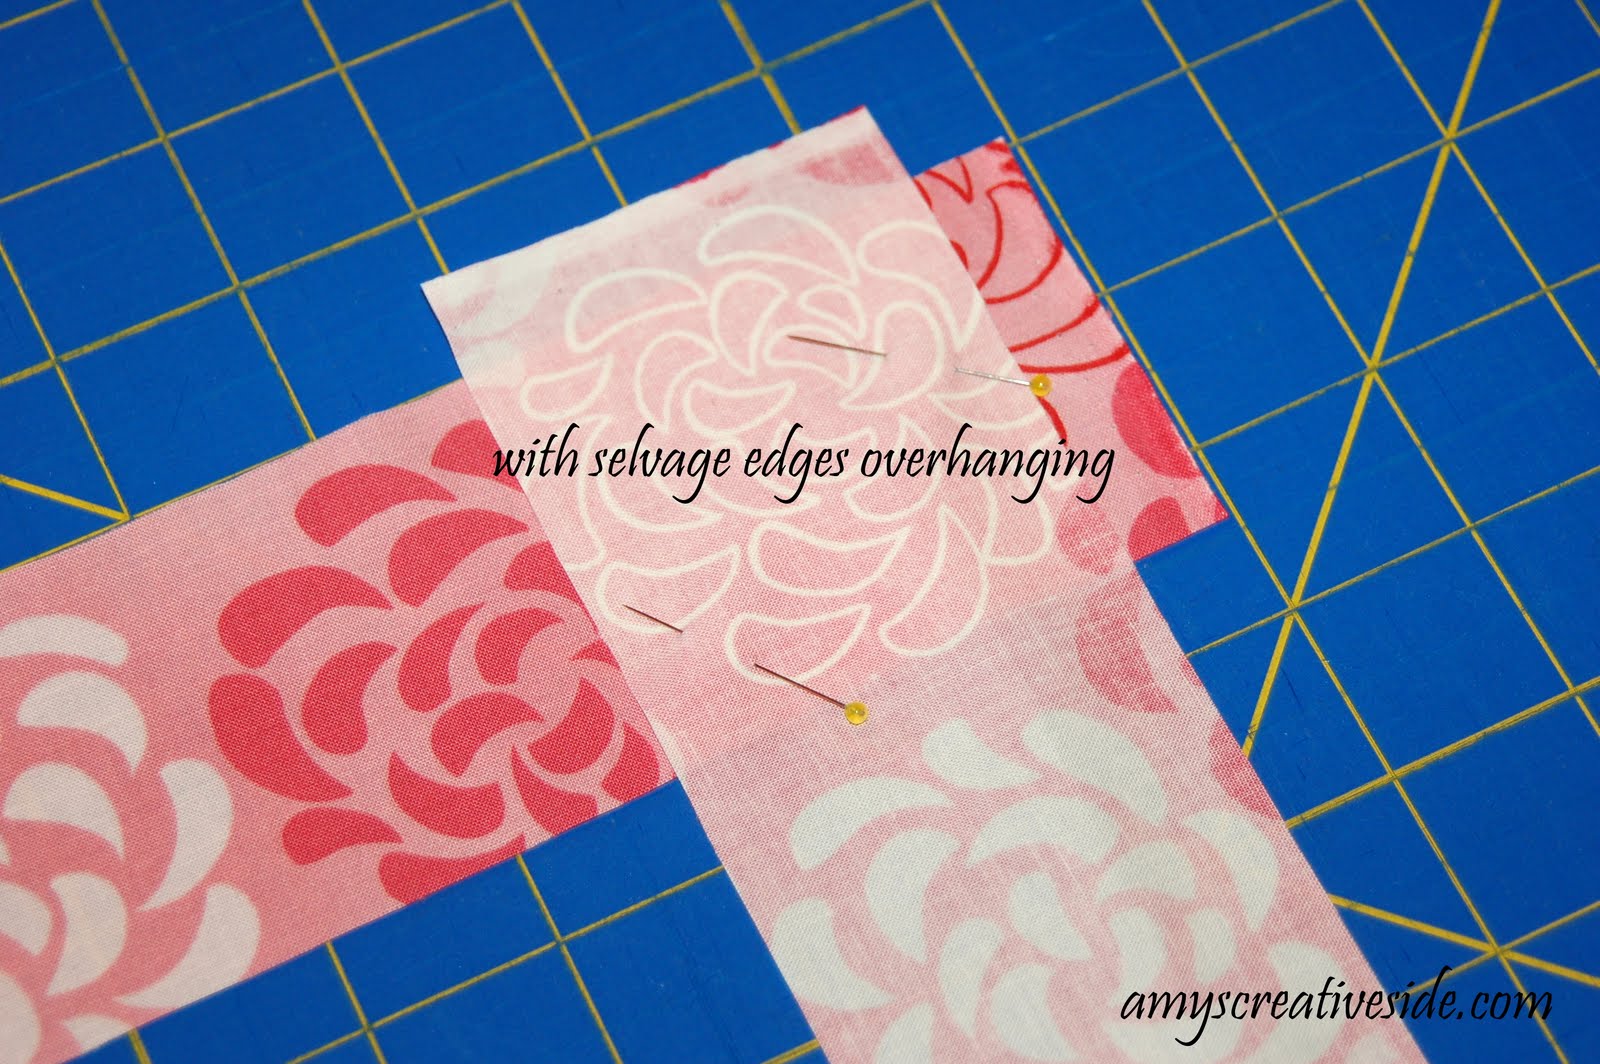
Next, you need to sew all your strips together to make one continuous strip. Overlap your ends at a 90 degree angle, but leave your selvage edges hanging over the edge.
Mark a 45 degree line from corner to corner.
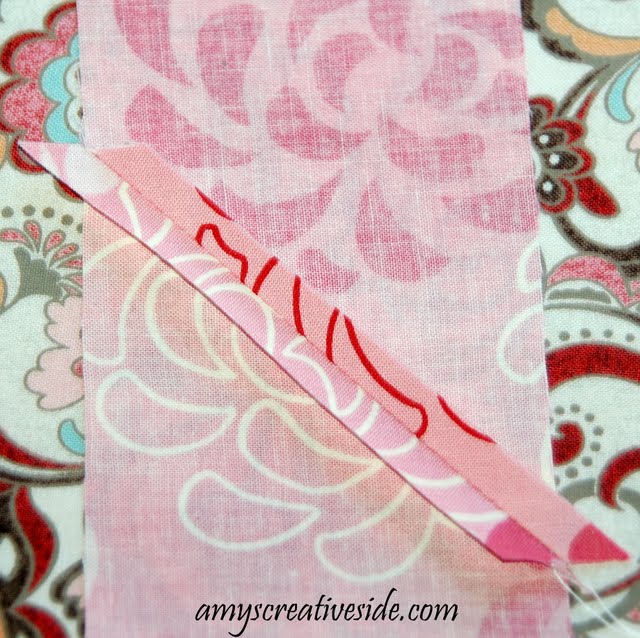
Now sew on the line.
Trim your excess - 1/4" away from the seam..
Press your seam open.
Clip the little tags from the edge. Repeat these steps for all your strips. (I usually do all of them at once)
Now fold the wrong sides together and press a crease in the long edge.
And fold your binding around a ruler as you go to keep things tidy!
The quilt pictured is available as a tutorial here.
---------------------------------------------------
Next steps:
Subscribe to Amy's Creative Side
Shop with Amy
Follow Me on Twitter
Become a fan of Amy's Creative Side on Facebook
Email me
Labels:
Tutorial
May 13, 2010
Basics Tutorial: Straight Line Quilting
At this point you should have your quilt basted, and your machine clean. Here's a look at how I use straight lines to quilt.
For straight lines - I use my walking foot
. They all look something like this.
Be sure to put the lever over the needle clamp, that moves the teeth on the top layer with the feet on the bottom layer.
To begin, line up your walking foot with a seam line, in the middle of the quilt. Like basting, it's good to start from the middle and work your way out. I like to use the outside of the foot as my guide.
When you reach the other edge, turn the quilt around and line up your foot with the previously sewn seam. I don't even clip the thread at this point, just keep sewing! Going back and forth across your quilt top keeps things even. If you went left to right every time your top may start to slide off to the right a little.
Alternately, you could introduce the walking foot guide, I believe these come with most walking feet. Gently click the guide into the gap, so that it is secure.
Now select the width between your seams.
I opted to move mine out as far as I could, about 3", and align it with the previous seam, or a seam in the quilt top.
See? Please note - it's not perfect! The overall effect is good though :) Be careful not to pull or inhibit the quilt as it moves under the needle. I do like to use quilting gloves
in spite of the awkward glances from my family! The gloves help me to better grip and move the fabric, with less strain on my hands.
Occasionally re-roll your quilt, so that everything continues to fit under your machine easily. Continue, back and forth, back and forth until you are all quilted. I did one seam with the guide, then the next with the edge of the foot.
It's a nice soft bit of quilting that I managed to finish in an afternoon :)
Other options for straight lines include diagonals, use some of your masking tape to mark where you would like to quilt. Then follow along side the tape with your walking foot. And wavy lines are a fun option as well, I usually go top to bottom and allow the fabric to gently flow back and forth as I sew.
I'm sure there's more, and a few questions. I will do my best to answer in the comments for everyone. I hope that this helps, and encourages some of you to give quilting a chance :)
Amy
The quilt pictured is available as a tutorial here.
ETA: You can also use your walking foot for any of the decorative stitches your machine may have! Think zig-zag, scallops, little flowers - sample a couple of rows on a practice quilt sandwich to see how they play out on a quilt top.
---------------------------------------------------
Next steps:
Subscribe to Amy's Creative Side
Shop with Amy
Follow Me on Twitter
Become a fan of Amy's Creative Side on Facebook
Email me
For straight lines - I use my walking foot
Be sure to put the lever over the needle clamp, that moves the teeth on the top layer with the feet on the bottom layer.
To begin, line up your walking foot with a seam line, in the middle of the quilt. Like basting, it's good to start from the middle and work your way out. I like to use the outside of the foot as my guide.
When you reach the other edge, turn the quilt around and line up your foot with the previously sewn seam. I don't even clip the thread at this point, just keep sewing! Going back and forth across your quilt top keeps things even. If you went left to right every time your top may start to slide off to the right a little.
Alternately, you could introduce the walking foot guide, I believe these come with most walking feet. Gently click the guide into the gap, so that it is secure.
Now select the width between your seams.
I opted to move mine out as far as I could, about 3", and align it with the previous seam, or a seam in the quilt top.
See? Please note - it's not perfect! The overall effect is good though :) Be careful not to pull or inhibit the quilt as it moves under the needle. I do like to use quilting gloves
Occasionally re-roll your quilt, so that everything continues to fit under your machine easily. Continue, back and forth, back and forth until you are all quilted. I did one seam with the guide, then the next with the edge of the foot.
It's a nice soft bit of quilting that I managed to finish in an afternoon :)
Other options for straight lines include diagonals, use some of your masking tape to mark where you would like to quilt. Then follow along side the tape with your walking foot. And wavy lines are a fun option as well, I usually go top to bottom and allow the fabric to gently flow back and forth as I sew.
I'm sure there's more, and a few questions. I will do my best to answer in the comments for everyone. I hope that this helps, and encourages some of you to give quilting a chance :)
Amy
The quilt pictured is available as a tutorial here.
ETA: You can also use your walking foot for any of the decorative stitches your machine may have! Think zig-zag, scallops, little flowers - sample a couple of rows on a practice quilt sandwich to see how they play out on a quilt top.
---------------------------------------------------
Next steps:
Subscribe to Amy's Creative Side
Shop with Amy
Follow Me on Twitter
Become a fan of Amy's Creative Side on Facebook
Email me
Labels:
Tutorial
Subscribe to:
Posts (Atom)