Hi there! We had a nice relaxed day yesterday to celebrate the 4th, and were up too late after watching the fireworks, but fun was had by all, and that's all that really matters!
Just in case you are starting now, these will catch you up -
So now it's time to make our blocks for week three :) You have squares down now - right? This week I have two new techniques for you, basics that will become second nature, with practice. Ready?
Our first block is called Two by Three and with it we will use strip piecing.
Here's what you need:
From two fabrics cut a strip 2 1/2" x 18 1/2"
From two more fabrics cut a strip 2 1/2" x 23 1/2"
Mine are paired light and dark fabrics, or more saturated fabrics.
Four strips total:
Now we are going to sew the strips together, pair up the same size strips and sew along one long edge.
Carefully press your seams open, now we need to crosscut segments for our block. Trim one end, when cutting segments, I always use the seam as a guide instead of the top or bottom of the unit, then my units are always square.
Turn to cut 5 - 4 1/2" units, from the longer set and 4 - 4 1/2" units from the shorter set.
If when lining up your ruler with your seam, the edge isn't straight, move the ruler over a bit so that it the 4 1/2" line is met, then cut, turn your square and clean up the other side.
Usually it's a tiny bit that you are trimming, but will make a difference in how things sew together...easy peasy!
Now we are ready to sew the block, lay out your pieces, as shown.
First sew the rows together -
Press and add another square to finish the row -
Press, then sew the rows together -
Starting at the top - pin and sew, then press seams open again.
Then pin and sew the bottom row to the block.
Press and your block is complete!
Strip piecing saves time and helps your piecing to be more accurate, when you trim carefully, I know that you will use this technique more and more as you quilt!
Block two is a Snowball Variation, and with it we will have a introduction to half square triangles (HST's).
Here's what you need:
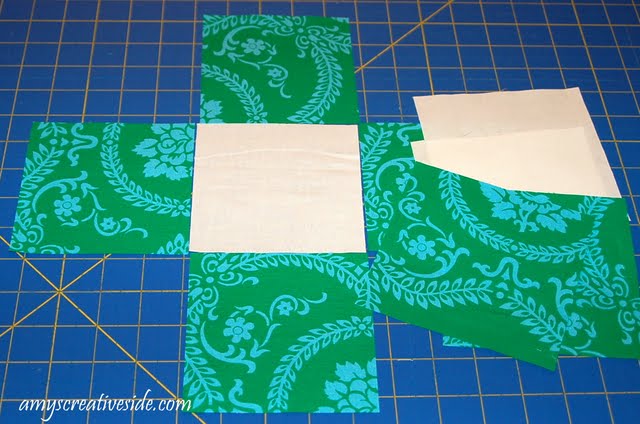
From your print - 4 - 4 1/2" squares, and 2 - 5" squares
From your solid - 1 - 4 1/2" square, and 2 - 5" squares
We have the square part of the block, but we need to make our triangle pieces, just a little magic...
On the wrong side of your solid 5" squares, mark the diagonal. Careful not to pull your fabric as you mark.
Any marking tool will work, but this what I recently upgraded to...I was in a pinch and my LQS just had these for marking -
Now add your print, right sides together.
Add a few pins to keep things in place - the diagonal is call the bias, which has a lot of stretch. If you are tugging and pulling too much things will start getting wobbly.
At the sewing machine, sew 1/4" away from the line you drew.
Turn the squares around and sew on the other side of the drawn line.
Here's mine post sewing -
Now back to the cutting mat to cut along the drawn line, using your ruler.
Are you with me?
You will have 4 total units.
Now press your seams open, carefully, remember the bias...
Now it's time to trim things up again, remember the rest of your squares were 4 1/2", so we want these to be the same. Use the 45 degree line on your ruler, to line up your seam.
Notice the ruler is lined up to 4 1/2", or slightly over, trim then turn and trim the opposite in the same manner.
Often you will find instructions for sewing HST's with a smaller measurement, and they won't require trimming...I prefer to cut things a tad bit bigger and trim to the size required. I find that I have less frustration this way.
Trim all four so that your HST's look like this -
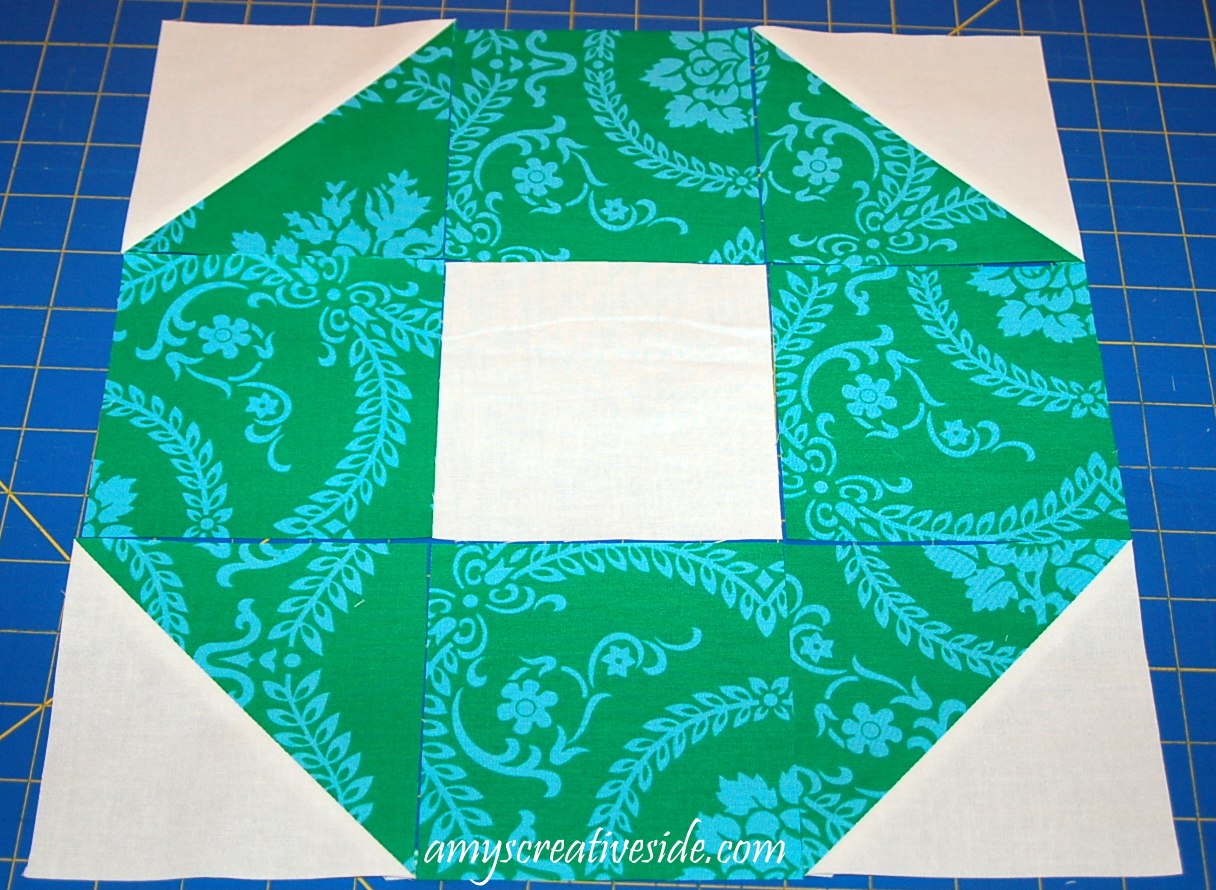
Now we are ready to sew our block! Layout your pieces like so-
And sew the rows together. I've learned when working with HST's that it is easier to sew from the side that doesn't have the diagonal seam, toward that does have a diagonal seam - when possible. Does that make sense? If I start, where there's already a diagonal seam allowance it's harder to get the machine going - so I work up to it. This means I turn things around a bit, but don't have to pick stitches out.
Left to right sew the rows together, pressings seams open.
Pin carefully, the bias is not yet fully encased and will still have the desire to get wonky on you. Just take your time :)
Now sew the rows, from the top down. In this instance you will have to start with the diagonal seam, make sure you hold your threads tightly as you begin, and maybe use them to pull your block along the first couple of stitches.
Press seams open and add the last row.
My 6 blocks -
How are you feeling about these!? The new stuff will take some more practice, coming up in the next few weeks, but the best way to learn it is to just jump in and get started! I hope everything is clear.
**After you make your blocks, post about them on your blog, then post a link here:
Let me know if you have questions and I will answer them in the comments :)
Happy Quilting~
Amy
---------------------------------------------------
Next steps:
Subscribe to
Amy's Creative Side
Shop with Amy
Follow Me on Twitter
Become a fan of
Amy's Creative Side on Facebook
Email me


28 comments:
i'm making...or should say, trying to make half size squares--so far with the first four, i have three different sizes. obviously i'm doing something wrong. it's ok, because i'll just sash them up differently. must not be compensating somewhere!! or my math is off--a distinct possibility. anyway...they're turning out so cute and i'm game to keep trying. it's fun to work in small scale as a diversion from my other projects. have a great day
3+ hours and I finished Block #5 by far the hardest block yet and it did not turn out very well...Lucy
So beautiful! These look amazing together so far. I hope to get caught up some time this summer.
Amy, once again, thank you so much for doing this. I am having a ball. Having been quilting for many years now, it might not be the most infomative thing to say, but I think your tutorial is very clear and worded nicely. I have even picked up a few tips from you. Thanks again.
Amy, once again, thank you so much for doing this. I am having a ball. Having been quilting for many years now, it might not be the most infomative thing to say, but I think your tutorial is very clear and worded nicely. I have even picked up a few tips from you. Thanks again.
Hi Amy! I sure do wish the internet had been around when I started quilting...over half my life ago - yikes! You're blog would have taken years off my learning curve!
Monday's are exciting thanks to you! :)
I have put my first post showing the first Week I block on my blog...I have also started a Page on my blog regarding this quilt-along to try to make it easier for people to follow the progress (or lack of..). I am learning the blogging process, so please forgive any goofups or repeats regarding this. It is still fun and I am looking forward to creating something I would not ordinarily do.
I've got my blocks finsihed! I was nervous about the HST but I troopered through them! These blocks took me a little longer than the previous!
Hi Amy! Quick question. On the second block you posted today (#6) you instructed for using a solid. None of the fabrics I've been using are solids. Should I use the solid that I bought for the binding & back, or add a different fabric? Thanks!!
Everyones blocks are looking great!! I will have a chance to do mine hopefully tomorrow!
I also wanted to share that I have moved my blog!! So I can comment on everyones blogs now instead of just the ones with name and URL, look for me as "mequilting"
Thanks
Lindsay
http://mequilting.wordpress.com
Rayfamily - Originally here - http://www.amyscreativeside.com/2010/06/simple-sampler-quilt-along-details.html
I had suggested a solid, but if you don't have one handy, I would use something that really contrasts with your main fabric.
Does that help!?
This is so fun Amy! Thanks again for being awesome and doing this!! I know how time consuming the tutorials probably are but its so great to learn new techniques!!!
Thanks for some great blocks this week Amy!! My blocks are finally complete!
Lindsay
Great blocks! Can't wait to see what's next! :)
I linked to the first block for this week. I haven't had time for the second one yet. This weeks blocks are really cute.
I just found this quilt along. I am going to do it. I will go back and do all three weeks then come and add my name to this weeks list. I have already added your button to my page. Thank you, great tutotials.
Finally finished my blocks, but for some reason I'm not seeing the Mr. Linky. My post is here!
Thank you for great tutorials -- I am going to have to do some practicing ;)
Amy, thanks for all the time you've put into this quilt-along. I'm really enjoying sharpening my skills.My favorite part is looking at all the other beautiful blocks others are making!
Hi Amy: I posted this week's blocks, and I just noticed that I made my strips with different color qualities than you made yours, and I didn't intend to do that. I love the blocks we've done so far. Thanks for this quilt along.
Was able to get weeks 3's blocks done yesterday afternoon. Love those days off. Good news is I have next monday, so hopefully I'll stay on track. Thanks, Amy, these blocks are lots of fun!
Amy!
I'm still here and still making my blocks and for both quilts!!! I am loving this...thanks again!
hugz, Pam
I've had a great day making the blocks for this week today,it's a great learning curve!
Happy quilting to all.
Georgie x
Well..I made it!! Block #6 is done and ready to go! Wow this was the hardest one I made yet. AS of today I don't think I will making a quilt with triangles any time soon!!
I did go to a quilt shop and I bought a Sew Easy Guide for my sewing machine and it made my life a little easier.
I am ready for the next 2 Block...
Amy thanks for your support...Lucy
I got a bit behind last week (doing my prayer square blocks). So, today, I made block 6 which went together perfectly, thanks to your wonderful directions. Looking forward to week 4 blocks!
Yay! Finished Week 3's today. Your instructions are great and I can say without a shred of doubt that this quilt-along is making me a better quilter. Thanks, Amy!!!
I got mine finished last night, finally!
Post a Comment