If you haven't seen a post from me in a few days - please click over and subscribe once again. You may also need to update your sidebar, if you are using blogger, as the feeds have changed. I posted a finished quilt on Thursday, and another great Featured Quilter on Friday.
Hope you are having a great weekend~
Amy
---------------------------------------------------
Next steps:
Subscribe to Amy's Creative Side
Shop with Amy
Follow Me on Twitter
Become a fan of Amy's Creative Side on Facebook
Email me
July 25, 2010
July 21, 2010
De-Stashing!
I know you all have told me it's okay to have a stash....I just don't have the space to store it! Someday when I have a studio - someday (sigh...) for now, I'm selling a bunch off.
ETA - Wow! Everything is gone - thank you all! My site will be down for a while today for some upgrades. I'll be back tomorrow with my new pattern and a winner or two!
Happy Quilting~
Amy
PS -- I'm so happy that so many of you are rising to the challenge!!
---------------------------------------------------
Next steps:
Subscribe to Amy's Creative Side
Shop with Amy
Follow Me on Twitter
Become a fan of Amy's Creative Side on Facebook
Email me
July 20, 2010
One Thing, One Week Challenge :: 1
Are you ready!? How will you challenge yourself this week?

I don't want you to be stressed out about this challenge, but I do hope to MOTIVATE you. Finish something, start something, just don't be overwhelmed by everything - One Thing! You decide, what's reasonable for you to get done in a weeks time, and tell me your goal in the comments. Next Tuesday, I will have a linky and you can link to your blog/flickr post,
and show off your met goal!
**For those of you that meet your goal, you will be entered to win:

An Origins Charm Pack, courtesy of Natalia @ Piece N Quilt - Thanks Natalia!!
Personally, my goal for the week....Finish quilting my Dresden plates. I have a plan, threads selected, I just need to sit down and do it! I'm guessing there's a few of you that can relate...:)
Post a button and tell your friends - hopefully we can all check one thing off of our list!
Happy Creating~
Amy
PS ~ My blog is going to have some downtime on Wednesday - major upgrades!
Don't panic, I'll be back :)
---------------------------------------------------PS ~ My blog is going to have some downtime on Wednesday - major upgrades!
Don't panic, I'll be back :)
Next steps:
Subscribe to Amy's Creative Side
Shop with Amy
Follow Me on Twitter
Become a fan of Amy's Creative Side on Facebook
Email me
July 19, 2010
Simple Sampler Quilt Along -- Week 5
Happy Monday! I have the blocks for our Simple Sampler - I hope that you are having fun, and maybe learning a bit too. I've been tempted a few times to sew up all the blocks, but I have really enjoyed doing two blocks a week with you guys, so I haven't!

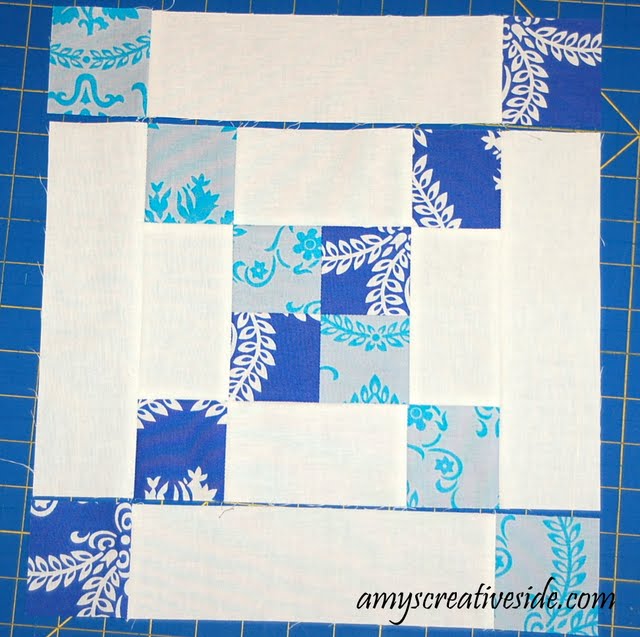
 Pin and sew your center 4-patch
 Match up your center seams, and complete the 4-patch.
 Pin, sew and press your seams open.
 From the sides add, the 2 1/2" x 4 1/2" rectangles.

 Pin, sew and press your seams open.
 Next, add your 2 1/2" squares to both sides of the remaining 2 1/2" x 4 1/2" rectangles.
 Pin, sew and press. Line things up again -
 Match up your squares, pin, sew and press.
 Almost done! Add the rectangles to the sides once again.
 And the remaining squares to the rectangles.
 Pin, sew and press.
 Add the top and bottom to your block.
 Pin, sew and press once more :)
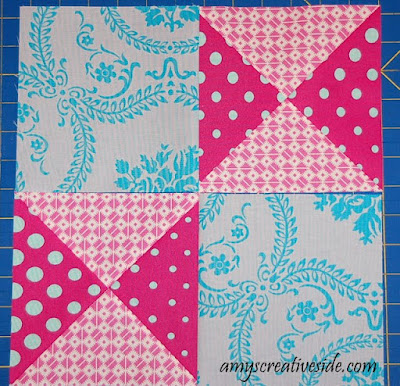
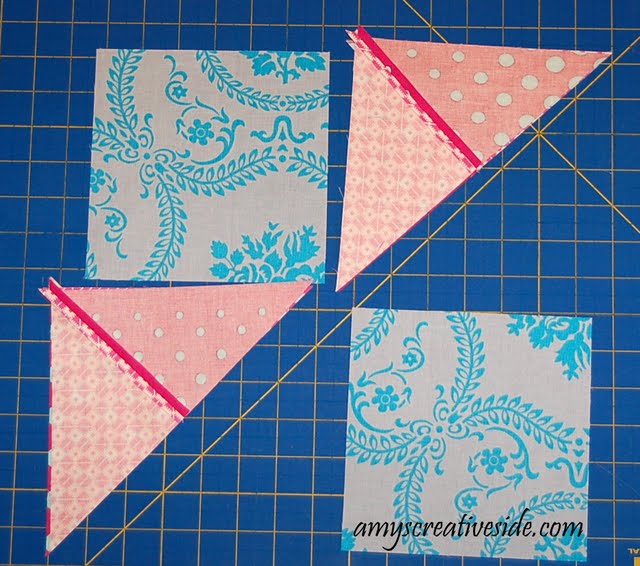
Our second block is variation of a 4-patch, we are adding hourglass blocks to it.
 Here's what you need:
2 - 6 1/2" squares in one fabric
1 - 7 1/2" squares in two different fabrics - these will be your hourglass blocks.
Take your 7 1/2" squares back to the cutting mat, and cut on the diagonal.
 Then cut into quarter-triangles, I've found a second ruler, with the 45 degree angle to help mark the center, and keep things straight. Just move it away once, you are all lined up, and cut.
 Repeat with your second 7 1/2" square.
 **There is another way to make an hourglass block - we will get to that method later...
 Layout your pieces, as you would like to sew it.
 Lay the quarter triangles over one another.
 Pin, and sew from the center, out. We will be trimming the outside of the block later, so having the center match up is more important. Press your seams open.
 Now turn the triangle units over on one another, match center seams, pin and sew. Press open again.

 We trim the hourglass blocks down to 6 1/2" to match the squares that we cut earlier.

With your ruler lined up on the 45 line, also mark the center of the hourglass at 3 1/4". Trim two sides, then turn your block line it up again, and trim the other two sides.
 All trimmed up and ready to finish the block!
 Join the left and the right. Pin, sew and press.
 And join both halves together.
Here's all my blocks! Three more weeks of blocks, then we get to add sashing - it's coming together!

**After you make your blocks, post about them on your blog (or flickr), then post a link here:
---------------------------------------------------
Next steps:
Subscribe to Amy's Creative Side
Shop with Amy
Follow Me on Twitter
Become a fan of Amy's Creative Side on Facebook
Email me
If you are starting now, these will catch you up -
Simple Sampler Quilt Along Details (includes a pic of the quilt)
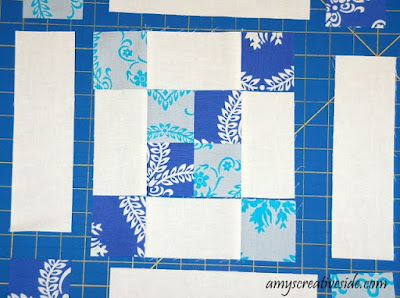
This week we have a 6-Grid Chain, these are great blocks to alternate in quilt tops, and a perfect addition to our sampler -

To make the Chain block you need:
6 - 2 1/2" squares from two fabrics
From your solid:
4 - 2 1/2" x 4 1/2" rectangles
4 - 2 1/2" x 8 1/2" rectangles
Lay out your pieces in the block formation, we will work from the center out.


Our second block is variation of a 4-patch, we are adding hourglass blocks to it.

2 - 6 1/2" squares in one fabric
1 - 7 1/2" squares in two different fabrics - these will be your hourglass blocks.


With your ruler lined up on the 45 line, also mark the center of the hourglass at 3 1/4". Trim two sides, then turn your block line it up again, and trim the other two sides.


**After you make your blocks, post about them on your blog (or flickr), then post a link here:
Please post a permalink, do this by clicking on the title of your post, and copy that url, then paste it in the linky. Thanks!
How are you doing with these? Little more tricky, but fun - I love the variety we are getting :) My blog will be down this week for a few hours of maintenance and so I made a pdf of the instructions, the file is pretty big, but it's all there!
Happy Quilting~
Amy
---------------------------------------------------
Next steps:
Subscribe to Amy's Creative Side
Shop with Amy
Follow Me on Twitter
Become a fan of Amy's Creative Side on Facebook
Email me
July 17, 2010
Weekend Spotlight
This weekend the spotlight shift to --
 Reannalily Designs
Jen has some great patterns, and if you have any trouble with your 1/4" seam a very handy seam guide as well! Seamingly Accurate is a quick and easy way to improve your quilting and sewing!
Happy Quilting~
Amy
---------------------------------------------------
Next steps:
Subscribe to Amy's Creative Side
Shop with Amy
Follow Me on Twitter
Become a fan of Amy's Creative Side on Facebook
Email me
July 16, 2010
Featuring Nicoletta -- A Blogger's Quilt Festival Quilter!
Hi Friends! I'm feeling rather accomplished - I spent yesterday basting and quilting my quilt! Of course, it was between errands and meals, and afternoon pool time. The how question (How do you do it all!?) comes up now and then in the comments - I stay up late, and get up early! I've never been one to need 8-9 hours of sleep, 6-7 is good, 5 if I'm in a pinch :) Anyway, let me get a binding on it, wash it, and finish up the pattern and I'll show it to you next week! Do you have a favorite size quilt to make? I put a poll up, to gauge your quilt commitment level - let me know!
-----
Our featured quilter today is Nichi (Nicoletta) she's from Italy and I love her use of color. I hope you enjoy getting to know Nichi better and seeing her quilts -
I took my first quilting class in 2003 (after some years in collecting books and magazines) and I fell in love with it immediately…I was ready to fall in love!

I have always love colors above all and quilting gives me the possibility to play with better as every other kind of crafting. I like all the quilting techniques, traditional, appliqué and improvisational that I feel as the new way of expression but that, as the modern art, can't set aside from the perfect knowledge of the basic rules and the tradition.
My favourite quilting tip is to use all the fabric I choose for a project to finish that project ( for the border or the binding or the backing) so as to have the least scraps possible.

The inspiration for my Festival quilts came from the red fabrics in my stash …I would find a way to use them all together and the big hexagon pattern seemed perfect.

I love the quilts, I have quilts on my bed and on my sofa and I like to stay under them… so I like to make quilts!
-----
Thank you so much for sharing your quilts with us Nichi! I love how far reaching this quilt/blog community is :)
Have a great weekend everyone~
Amy
---------------------------------------------------
Next steps:
Subscribe to Amy's Creative Side
Shop with Amy
Follow Me on Twitter
Become a fan of Amy's Creative Side on Facebook
Email me
-----
Our featured quilter today is Nichi (Nicoletta) she's from Italy and I love her use of color. I hope you enjoy getting to know Nichi better and seeing her quilts -
1. When did you begin quilting?
I took my first quilting class in 2003 (after some years in collecting books and magazines) and I fell in love with it immediately…I was ready to fall in love!

2. Why do you quilt?
I have always love colors above all and quilting gives me the possibility to play with better as every other kind of crafting. I like all the quilting techniques, traditional, appliqué and improvisational that I feel as the new way of expression but that, as the modern art, can't set aside from the perfect knowledge of the basic rules and the tradition.
3. What is your favorite quilting tip?
My favourite quilting tip is to use all the fabric I choose for a project to finish that project ( for the border or the binding or the backing) so as to have the least scraps possible.

4. What was your inspiration for your Quilt Festival quilt?

5. Do you sew other things?
-----
Thank you so much for sharing your quilts with us Nichi! I love how far reaching this quilt/blog community is :)
Have a great weekend everyone~
Amy
---------------------------------------------------
Next steps:
Subscribe to Amy's Creative Side
Shop with Amy
Follow Me on Twitter
Become a fan of Amy's Creative Side on Facebook
Email me
July 15, 2010
Challenge Week
Hi there! I took a day off, just didn't have anything worth saying! :) Thanks so much for all your great ideas for naming my quilt. I think I have an idea decided on, but want to give it a few more days to make sure there's not a genius idea still out there :)

I really enjoyed being challenged a couple weeks ago, and have decided to issue you a challenge! Once a month, we will have a Challenge Week. You decide on one thing, one thing, you want to challenge yourself with for the week, tell me about it in the comments, and one week later I'll have a linky so we can check out each other's projects! I might have to work out a prize too - give you a little more incentive to get you motivated.
Next Tuesday, July 20th will be the beginning. Then on the 27th we will share our projects!
I really want to emphasize the one thing aspect - so often I get (and I know I'm not alone) overwhelmed with how many things I need to do and don't start ANY, so this will be a jumpstart! Cut out a quilt, piece a top, or finally finish that binding, whatever you have on your list that you just can't seem to get started, or finished as it may be!
I know that when I did a survey a while back lots of you expressed needing help getting motivated to finish things, and last week when I asked how many projects you have in the works, many of you were a bit shocked to have actually counted them. So hopefully this is just what you need!
What do you think? are you in?
Hope so! I need a challenge :)
Amy
---------------------------------------------------
Next steps:
Subscribe to Amy's Creative Side
Shop with Amy
Follow Me on Twitter
Become a fan of Amy's Creative Side on Facebook
Email me
July 13, 2010
Sewing with Linen & a New Quilt Top
Hi! I'm excited to share a new quilt top with you. I sewed blocks into the wee hours of the weekend, and yesterday started sewing the top up with my morning coffee. I really wanted to see this quilt top come together!
Sewing with linen....it's kinda squirrelly and needs lots of pins. As the weave is larger than the cottons we typically use, it has a tendency to not hold it's shape.
 I carefully pressed and blocked each piece as I added it to the block, to keep things as square as possible. This quilt top is not perfect, cutting was a challenge as well since it was 60" wide and my longest ruler is 24". But the fluidity that it adds, and the heft are really nice. It is slightly heavier than my quilting cottons - but I like it a lot!
 I know that there are a few linens being marketed to quilters, but I've not had a chance to work with these yet. I'd love to, and compare - eventually :) I love how the colors pop in these pictures!
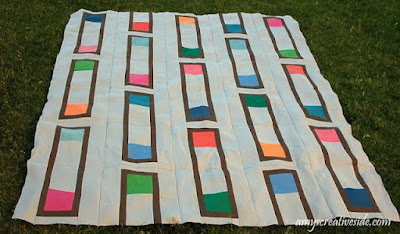 My quilt measures 60x72 inches and I have a pattern in the works! I need a little help naming this quilt...how about, if I pick the name that you suggest, you win a copy of the pattern when it's ready!?
Here's my kiddos- they were enjoying an evening swim, their cool down after dinner :) They keep me on my toes!
I hope you like my quilt as much as I do!
Amy
---------------------------------------------------
Next steps:
Subscribe to Amy's Creative Side
Shop with Amy
Follow Me on Twitter
Become a fan of Amy's Creative Side on Facebook
Email me


Here's my kiddos- they were enjoying an evening swim, their cool down after dinner :) They keep me on my toes!
 |
| My crazy monsters! Love them :) |
I hope you like my quilt as much as I do!
Amy
---------------------------------------------------
Next steps:
Subscribe to Amy's Creative Side
Shop with Amy
Follow Me on Twitter
Become a fan of Amy's Creative Side on Facebook
Email me
July 12, 2010
Simple Sampler Quilt Along -- Week 4
Hi Friends! I hope you had a great weekend - I was a working double duty all weekend with Joe backpacking up in the Unitah's. We had some special fun, a little bit of drama, and I stayed up late sewing too! I have blocks sewn up, and a few rows pinned for a top, hopefully I can show it to you tomorrow.
For now I have this weeks Sampler Blocks!
Just in case you are starting now, these will catch you up -
Simple Sampler Quilt Along Details (includes a pic of the quilt)
Originally I had planned to put all the HST blocks at the end and work up to them...but then I decided we should slowly work through them, so I have one more for you this week. I hope you aren't cringing - they really do get easier with practice, and that's just what we are doing! Perfection is good and all, but don't forget to enjoy the process, and learn as you go. And remember - I have been sewing for 20+ years, I've had a bit of practice with straight seams and working with my machine daily the last (almost) 2 years, it all makes a difference. Please don't get frustrated, or down on yourself.
Our first block this week is a traditional favorite - Log Cabin. You can make these so many different ways, I have one side in white and the other scrappy - feel free to play with color placement!

From your solid - cut 2 - 2" strips and cross cut into:
1 - 2 x 11"
1 - 2 x 9 1/2"
1 - 2 x 8"
1 - 2 x 6 1/2"
1 - 2 x 5"
1 - 2 x 3 1/2"
From a variety of prints -
1 - 3 1/2" square - fun opportunity to fussy cut a favorite part of your fabric
1 - 2 x 5" and 1 - 2 x 6 1/2"
1 - 2 x 8" and 1 - 2 x 9 1/2"
1 - 2 x 11" and 1 - 2 x 12 1/2"


Add your final print length, at 12 1/2", to finish the block!

I've told you how much I like starch, but I don't think I told you that when I've finished a block I like to set it with a little starch. When complete, AND ONLY THEN, (you don't want to shrink things before you finish) spray a bit on your seam allowances on the back to set. And carefully press. The seams lay nice and flat and I don't have to worry about things getting wonky as I wait to quilt. Not necessary - but something I find helpful :)
Our second block for this week is a mosaic block, my software named it Mosaic, No.5...so uninspired! Let me know if you have a good name for it - I think a quilt full of these would be really fun.

From your solid - 8 - 4" squares.
From one print - 2 - 4" squares.
From a second print - 6 - 4 " squares.
If you aren't using a solid, look to the contrast of your fabrics - the difference of light and dark in your fabrics.


Let me know if you have questions and I will answer them in the comments :)
Happy Quilting~
Amy
---------------------------------------------------
Next steps:
Subscribe to Amy's Creative Side
Shop with Amy
Follow Me on Twitter
Become a fan of Amy's Creative Side on Facebook
Email me
Subscribe to:
Posts (Atom)