Mochi Studios is a place of hand made wonders and cute creations stitched with love by Rita.
Her passion for hand made delights carries throughout all her creations from
the tiniest mushroom to the cuddly plush toys that all keep you smiling. Her
projects are born from spur of the moment inspiration with a style that is
vibrantly playful and full of kick-you-in-the-face detailing. Her favorite
times to work are late at night when angry neighbors start to complain of her
sewing machine rumbling their ceiling, during long drawn out phone conferences,
and on nice sun filled evenings just before twilight with a cup of boba milk
tea as her fuel. Her creations will charm you with their looks and defeat you
with their cuteness.
Q: What
inspired you to start crafting?
When I was
young, my parents never let me buy anything, so I would make things instead.
Much credit and gratitude goes to my elementary school art teacher who taught
me to sew, weave, paint, sculpt, and above all, love to create. Also, my
grandmother taught me to crochet and knit when I would spend summers living
with her. Since then, I've always enjoyed creating handmade gifts for friends
and family and teaching myself new crafts.
My creations
have lived in my imagination since the first time I picked up a needle. I
didn’t have toys growing up so I would enjoy sewing or crocheting toys to play
with to pass the time. As I grew older, I delighted in making and giving handmade
presents to my friends and loved ones. About two years ago, I went to my first
Maker Faire in San Mateo and fell in love with the
DIY scene and was determined to participate in its craft fair called Bazaar Bizarre the next year! So the following spring,
I applied with my collection of plush toys, bags, and pillows but sadly was
rejected which broke my heart. Driven to pursue my dream, I spent the following
six months refining my technique and focusing on developing a line of plush
toys and Mochi Studios was born. Pleased with my initial success of launching
MochiStudios.com and selling my plush toys through my website, I was still
determined to break into the craft fair world. I applied to the SF Holiday
Bazaar Bizarre and was thrilled when I got accepted! That was really the
turning point for me and Mochi Studios became a full time part of my life.
Q: How did you come up with the Rice Babies and Ninja Beans?
The first Rice Baby I've ever made was a bunny one for my friend who loves all
things bunnies. I made it as a good luck charm for her SATs so she could
squeeze it in her pocket and smile. Then I started making Rice Babies in other
animal shapes for my other friends' favorite animals. Back then, I actually
filled the Rice Babies with rice since it was something that I always had lots
of in the pantry and it gives them a nice weight too, hence the name, Rice Babies!
Like most of my newer creations, the first Ninja Bean I made was a gift for my boyfriend Lam for
our anniversary in June. My Ninja Beans
have since evolved since then. I made the first one out of black and white
fleece and now I sew Ninja Beans from patterned quilting cottons and add a lot more
embroidered and painted embellishments. I've had lots of request for
customizing Ninja Beans for a special someone which is always a joy to make!
Q: Who are your favorite crafters?
Eleen is a local Bay Area
artist who I first met at the SF Renegade Craft Fair two summers ago and who has
really inspired me to start and grow my business. Her beautiful bags are made with
gorgeous designer fabrics and are wonderfully handmade!
I also really admire the fabric dying and quilting work of Malka. Her work is
always so vibrant and colorful and urges me to play with unexpected color
palettes, combinations, and designs.
Also, Christine
makes the most adorable plush creations with all different types of fabrics. Each
of her plushies are so carefully made with so many loving details. My favorite
part is the embroidered patch on the back of her larger plushies.
Q: What do you prefer - crochet, sewing, embroidery, knitting or something
else?
I can't
say that I prefer one art over another because I love them all! In everything
that I make, I like to combine techniques. My mushrooms, for example, are
embroidered and sewn by hand with crocheted gills on the bottom. If I had to
choose, I'd say I probably enjoy embroidery the most because I can embroider
embellishments and details to anything to turn something boring into something
fabulous.
Q: What has been your experience with craft fairs?
I was nervous about my first craft fair but all my meticulous planning
and preparation really paid off.I made
a checklist of my goals of everything I wanted to make to sell at the fair and
set weekly deadlines so that I would meet my goals. I also researched other
people’s experiences and advice about craft fairs which was really helpful in
preparing me for my first craft fair. Here are some helpful links:
At the fairs themselves, I’m always really happy with my over-preparedness
and really enjoyed seeing face light up and smile when they see and squish my
plush toys and making friends with fellow vendors and swapping goods. Overall,
it was a lot of really hard work and sleepless nights to sew enough plush toys
to sell at the craft fairs and a lot of stress to figure out all the little
details. I was so exhausted after two weekend holiday craft fairs that I sadly
didn’t have enough time and energy to make Christmas presents for my friends
and family. What I gained the most from vending at the craft fairs was the
friendships I made with the vendors and customers, the exposure for Mochi Studios, and the satisfaction of doing what I love and making people smile
(which I don’t get from my 8-6 job). I probably won’t do two craft shows back
to back again but I do look forward to applying and vending in future craft
shows! Here I am
again, working on my application for the Maker Faire Bazaar Bizarre right now.
Wish me luck!
See something you like? Feel free to email Rita for a special
custom plush toy!
Thank you
so much, Amy, for interviewing Mochi Studios!
-----
Thank you for sharing Rita! I hope you all go subscribe to Rita's blog so you can keep up with her and her exciting creations :)
Tara is taking a look at hand-printed textiles and the beautiful addition they can make to our creations. I hope you enjoy a fresh look at fabric --
-----
if you're looking to add a certain *je ne sais quoi* to your projects
big or small, you must check out the wide assortment of hand-printed
textiles available online. these fabrics are not only designed
independently but they are printed screen by screen in a process that,
frankly, blows my mind a little.
since each piece is printed by hand, there is a deeply organic
quality to each section of the fabric. a small smudge or drip - though
rare - shouldn't be thought of as a flaw but as what makes the fabric
truly unique.
the three selections i chose represent two basic trends in
printed textiles - bold patterns and bright colors. both lend
themselves to the printing process exceptionally well and also help you
to up the pizzazz factor when working with textiles of this kind.
now, some of you might be concerned about the price. certainly a
hand-printed textile is not a spur-of-the-moment kind of purchase but
choosing to splurge a bit on a small amount might just be the decision
that takes your next project from nice to wowzer.
finally, if hand-printed textiles get your creative juices flowing,
don't limited yourself to artists that only print yardage. you'll find
a whole array of screen-printed tea towels that are perfect for
cutting, slicing, & working into your next project!
-----
about tara
tara gentile is the editor of scoutie girl, the blog with a passion for people and the stuff they
make. she is also a wife, momma, and wordpress designer who blogs on
her personal portfolio, taragentile.com.
-----
Thanks Tara! I love the prints and colors used in these examples! Can't wait to explore this more, what about you? Do you think you might add some hand-printed fabrics to your next project? Let me know if you do :)
I am so honored that Amy asked me to be a guest blogger on her blog today.
How did I get into quilting? I was born on my great grandmas birthday. Even though she died when I was very young I have always claimed that she is my sewing inspiration. She was a very avid hand quilter and won many awards for her work. Growing up my mom owned a custom curtain and drapery business. I loved watching the ladies sew and would take their scraps and make my own quilts, which were pretty scary.
This is my very first quilt, I used all sorts of different scraps and I think now it's scary but it actually went to the state fair and won a blue ribbon there.
Throughout the years I continued to sew and did a lot of applique by hand.
This is one of quilts that I did all of the applique and embroidery by hand.
Two and a half years ago while I was pregant with my daughter Chesney I decided that I wanted to make her crib betting. I went to my LQS and purchased all of the materials to make the bedding. On my drive home, (about 45 minutes) I had a lot of time to think. Somehow I came up with the idea to purchase a long arm machine. I had never even seen a long arm machine before but I decided I should buy one and then maybe I could earn a little bit of money while staying at home with my daugther. A few weeks later we had a new Gammill Long Arm Machine in our spare bedroom.
Right after purchasing my machine my sister introduced me to jelly rolls. I was in LOVE, I loved the variety of the fabric and I love the precision cutting. Things just went precut crazy from there. I taught a few classes and was a guest speaker at a few retreats around Utah about what pre-cut fabrics are. In January of 2009 I launched my business online and even after many sleepless nights I would not change that for the world. I enjoy meeting other quilters and sharing my love of fabric with them.
Last May Kathleen and I decided to create our first quilt to be entered in HMQS. This was the first time that I really pushed myself to think outside the box with my quilting.
We designed this Dasies & Lattice quilt, although it didn't win anything at that show we did learn a great ammount from the judges comments. I entered this quilt into the local fair and won Best of Division.
This spring Kathleen and I wanted to make a quilt from precut fabric to be our show quilt for the year. We ended up with this "Strut Your Stuff" quilt.The top (besides the borders) is all made from jelly rolls. I love how it turned out. This quilt did win a few contests as well.
Just a few weeks ago I shared my first quilt on Moda Bake Shop. This is one of my many dreams come true and I feel so honored to be able to share some of my ideas on there.
Quilting hasn't always been glorious, there have been many, many back aches, many bottles of Ibuprophen, quite a few tears shed, way too many unpicked stitches than I want to think about, many nights up until 3 am working on last minute projects and more quilts quilted than I can count. I still have never actually bound a quilt by myself. Kathleen has a industrial machine and she actually enjoys binding so I have yet to learn that skill.
Some of my favorites:
*I prefer to use Moda fabrics. I love the quality and most of all I love the fabric choices.
* I sew on a Bernina machine.
*My long arm is a Gammill Premer with a stitich regulator.
Don't forget to check out my blog, I'm always adding new tutorials and fun ideas!
~Thanks again Amy, I have really enjoyed reading your blog and getting to know you.
------------------------------------
Thank you Natalia! I'm always excited to see what you've been working on, and who's quilt is being quilted - your work is always beautiful!
Natalia didn't mention it, but she has a coupon for 40% off your entire order through today (12/31/09) - she's got what you need to start a new project or get the wip finished up :)
Thank you so much for all your lovely comments on my blogging milestone! I'm not going to be able to respond to you each individually - but know that your comments mean so much to me - Thanks!
Vicki is a blogger friend I met a while back, and I wanted you all to get to know her too! I love her attention to detail in her projects and her love for her family. Enjoy ~
Hi! I'm Vicki and I blog at Sew Inspired. I grew up in Utah but in 2003 our family moved to the Kansas City suburbs. I have 3 kids ages 9, 5, and 1, and my husband and I have been married for 12 years.
I wanted to share a bit about my sewing history and show off one of my early quilts, too. My first sewing project was a little bear kit that my mom helped me make when I was 6. When I was 9 through 12 years old, I took 4-H sewing classes in the summers and made clothing for myself and my sisters, as well as lots of Barbie doll clothes (I got a Barbie clothes sewing pattern for Christmas when I was 10, I loved it!)
In high school I took two full years of sewing classes and really enjoyed it! I sewed some of my clothes and made things for others as well (one project that comes to mind is sewing bridesmaid dresses for my mom and my aunt for my uncle's wedding, when I was almost 17.) During my college years, sewing kind of took a back seat but I knew I would get back to it someday.
Soon after my husband and I were married in 1997, I went by myself to the quilt show at the Springville Museum of Art and I was just amazed, and in love, with quilting, and knew I needed to be a quilter. I had made a quilt with my grandma in 8th grade, and worked on a couple of other patchwork type projects as a teenager, but I hadn't ever finished a real quilt since junior high.
So I bought a rotary cutter and some purple and green fabric, and made my turtle quilt that I wrote about here. I also made a patchwork quilt with just simple squares for my oldest niece when she was born, and I think it's the only quilt of mine that I never took a picture of.
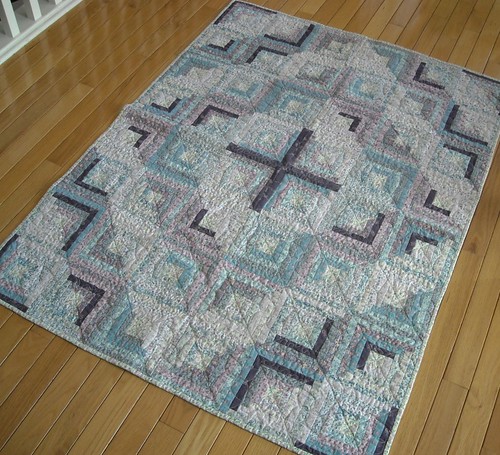
I made this log cabin quilt in 1999 and it was shown in the Springville Art Museum quilt show in 1999. I was quite ambitious and made the finished width of the strips 3/4". I remember choosing the fabric, planning out the quilting designs, and trying to figure out how to press the blocks and have them keep their square shape. I look at it now and it makes me realize I've learned a lot in the last 10 years--I wonder where my quilting will be in another 10 years?
I'd love it if you visit my blog to see some of my more recent work!
Amy again!
Vicki has been busy getting ready for Christmas with her family - she has some great gift and advent ideas. I hope you have a chance to poke around her spot today! I hope my quilting continues to progress over the next 10 years, where do you hope to be?
Amazing art! So beautiful! :) I love the Ocean Surf Scarf colors! :D They are all so beautiful but my closet is fairly monotone in the blue family :D!
You should have an email from me - Congratulations!!
Hi There! My name is Candy, an art quilter working exclusively with my own hand dyed fabrics – they’re “Candied Fabric”! Amy’s asked me to tell you folks a little bit about what I do, and I’m honored to share a bit of my process with you.
With the roots of a traditional quilter, I LOVE taking smaller units and composing them into larger pieces. What I’m enjoying most these days is making small quilts that can be arranged and rearranged for display, rather than having to commit to just one arrangement and sewing them into one large unit! (You know - that stage where you’ve got the blocks on the working wall and you keep rearranging them ‘til you go insane?)
My latest series is inspired by the work of the awesome Skinny LaMinx, whose 2 color silkscreen designs often feature a sketch on a large, irregular patch of color. I had a lot of fun picking 2 different palettes of colors to work with (the “Jewel Tones” and the “Warm Colors”), then cutting nicely irregular patches from pre-fused fabric and ironing them onto a backing fabric. I then centered these over 6" x 8" layers of batting then peltex (used to stiffen baseball cap brims). I wrap the background fabric around to the back and carefully fuse it to the back. The peltex adds a bit more definition to the quilting, and makes the quilts stiff enough to stand propped up anywhere, and hang nice and flat.
Then comes the funnest part (is funnest a word? Spell check says NO! but I say YES!), the sketching! I free motion quilt a botanical motif on the quilt, going over the quilting 2-3 times, purposefully trying NOT to follow the lines – this gives me a nice bold line that emphasizes the fact that this indeed is a sketch done by hand, even though a mechanical tool was used. Here are videos of me doing 2 of them (apologies for the random sounds, on my LONG list of things to do is to learn how to set music to a video…)
I had these playing in my booth at one of the art shows I did this Fall, and the videos got lots of attention. Here are answers to some frequent questions I got:
1.The speed of the video is not altered, it’s in real time.
2.There is nothing sketched on the fabric, I lower the feed dogs, decide what I want to sketch and go!
3.Practice Practice Practice! ;-) I’ve been doing free motion quilting for 15 years. Harriet Hargrave’s book got me started; a weekend with Melody Johnson at QSDS 11 years ago set me free.
4.A Juki TL-98 Q. It has a bit more space under the arm than regular home machines and is super fast, but it’s a pretty simple, straightforward machine.
After the quilting is done, a layer of fabric on the back covers it up, I then stitch on a hanging loop. And then the fun begins, playing around with arranging them. Although they could be hung directly on the wall in a grouping or individually, I had envisioned them hung on a mini clothesline, and luckily, I love the execution as much as I had imagined it.
As this is the giving season, I’d love to share some Candied Fabrics with you. Go take a look at all the different palettes I use for dyeing my scarves and pick your favorite one.Come back here and let me know and you could be the lucky person to win either a Habotai scarf or ½ yard of fabric custom dyed by ME for YOU!