A few things you will need:
masking tape
safety pins
an hour or so of time
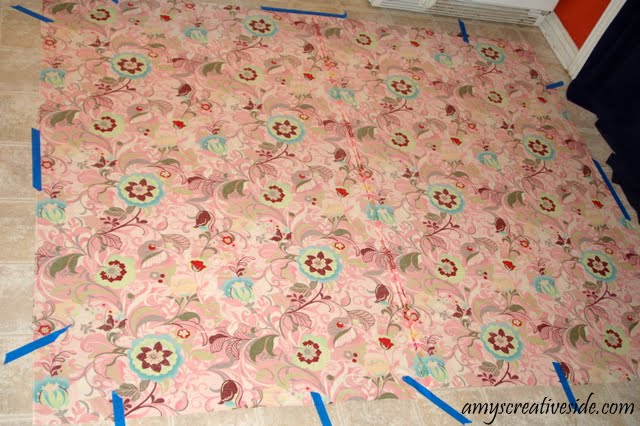
To begin, clear a flat surface large enough for your entire quilt back to be spread out, in this case the floor, you may have a quilt you can baste on a table top, be sure you can pull it taut on a flat surface.
Then tape your edges down, notice I don't have my corners taped - you don't want to pull it out of square. Put down a couple pieces on one side then move to the other, adjusting the tape as needed. When you feel it is nice and flat, but not stretched you can move on.
Lay your batting over the top. Make sure you are orientating it in a way that all of your quilt top will have batting. My piece is larger than needed, so I turned it for the least waste. I can put little pieces to use in other projects, like table runners, bags - you name it!
I've been known to use a warm iron at this point (on the floor - yes!) for those stubborn wrinkles in the batting - usually just smoothing it with your hands works fine!
Next add your quilt top. Try to keep things straight working from the top or a side down. Smooth the top in place as you work. You will notice that it's sticking to the batting, gently smooth it with your hands.
All smooth? Good - now comes the tedious work! :)
Start in the middle, and pin every 5"-6" -- poke straight down and come back up with a little of each of your layers in the pin. If you get to much it won't close. How do you know you got all the layers? Trust in your abilities! If you need a little proof put a pin in at the edge to test, then take it out until you get back to that area.
Keep pinning! I usually work from the center, up to the top, then from the center down to the bottom. Out and up, or down.
Once you finish pinning, take a break! Ha - just kidding. You are almost there :) Trim away any excess, leaving plenty of backing and batting (3"-4") this makes it a bit easier to maneuver while quilting.
At this point, even if you are done working for the day - Don't fold it! It puts creases, that you don't want. I roll it to the center, or whichever works best for your planned quilting method.
Then roll it from one side to another so it fits in your lap!
I hope this helps!
Next up - straight line quilting.
Amy
The quilt pictured is available as a tutorial
here.
---------------------------------------------------
Next steps:
Subscribe to
Amy's Creative Side
Shop with Amy
Follow Me on Twitter
Become a fan of
Amy's Creative Side on Facebook
Email me


13 comments:
This was an excellent post and very informative!!!!!
You missed a need for when you pin baste on the floor -- good knees and the ability to get up! :-D
Thanks for posting this. Glad to know I'm doing the right thing...
This was helpful. I had a question, though... do you ever find you still get movement of the layers even after you pin? I have only ever quilted one small wallhanging on my machine, and at the last minute I panicked that I'd get puckers and used spray baste along with the pins. How do you prevent puckering?
Great tute! That's a really good point about not folding the quilt. I've only just recently discovered this after having some pucking in the centre of some of my quilts where I folded it - really annoying!
This is fascinating to me because I've always put my quilts onto a frame, well, until this winter when I just recovered the top of a favorite quilt of my girls and did in on the living room floor...yikes! I can't wait to see the rest of the steps, Amy!
Blessings,
Tammy ~@~
Excellent! I would add one thing - don't close your pins until you've got them all in. In the simple act of closing a pin, you can cause the fabric to shift. I wish I could remember where I learned that one....nope, I can't. But it's served me well.
I think I could just live on your blog, reading your tutorials and posts, you are great! I am glad that I found your site when I did!
Amy I am loving your quilt! Absolutely, love the simplicity of this quilt. It's stunning. I may do something similar. Thanks as always for the inspiration!
Super helpful, Amy. Thanks! I'm planning on straight line quilting my next quilt, so I'm eagerly awaiting your post on that!
I'm so glad you all are finding this helpful and well put!
Melissa, I do get a little bit of movement sometimes. Using the walking foot helps with straight lines, and starting near the middle when free-motion quilting helps then the puckers work their way out as you quilt.
Thanks for the tutorial. I hate basting quilts. Your help is going to make things easier. You are amazing.
question ~ it doesn't look like you have enough space to get around your quilt? how does that work? or maybe the floor space is bigger than it looks..... or, maybe, you are really skinny :-)
looking forward to the quilt festival!!
Lol - I'm not really skinny! I spend a lot of time on my knees reaching the areas that I don't have sufficient space around :) I try to keep the sink and fridge somewhat available while basting.... when I am pinning, I am on my knees in the middle of the quilt. Be gentle as you move from one place to the next, and you should be good!
Post a Comment